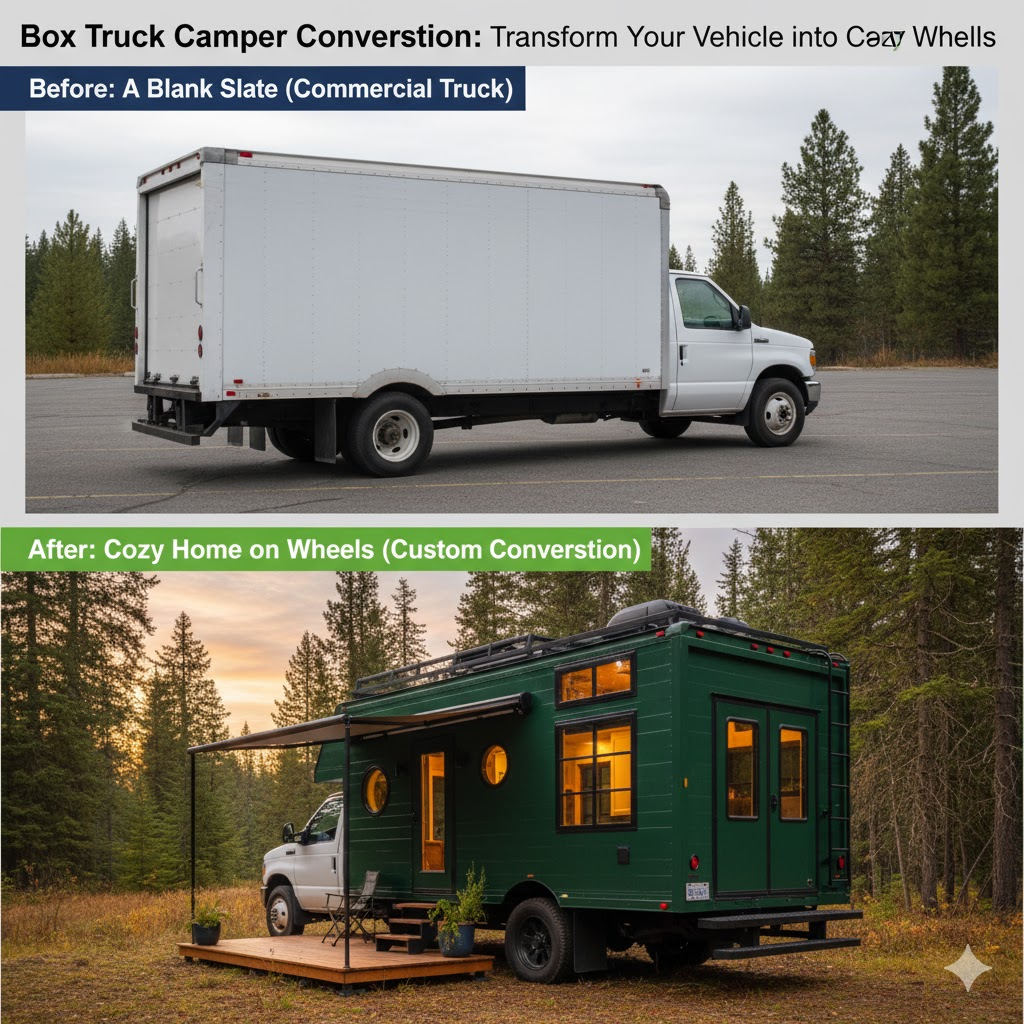
Introduction to Box Truck Camper Conversions
A box truck camper conversion blends the best parts of van life—stealth, mobility, and compact efficiency—with the straight-walled volume of a tiny studio. Unlike curved cargo vans, a box’s 90-degree corners turn out to be a secret weapon for modular furniture, clean cabinetry, and real insulation depth. Think of it as a blank, rectangular canvas for a tiny home on wheels: flat roof for solar, square corners for water tanks and wardrobes, and a roll-up or barn-door aperture that swallows bikes, boards, or a full workshop.
Benefits of Choosing a Box Truck
- Volume & geometry: Vertical walls and full-height ceilings simplify camper interior design (no compound curves).
- Stealth factor: Commercial look blends in; fewer campground restrictions than trailers.
- Roof real estate: Easy to mount a solar power system and roof deck; generous space for a vent fan installation and future A/C.
- Serviceability: Most chassis have off-the-shelf parts; walls are easy to re-frame during a box truck renovation.
- Payload headroom: Heavier mobile dwelling builds (wood, large battery bank sizing, fresh water system) are more feasible.
Essential Considerations Before Starting Your Conversion
- GVWR / payload: Weigh chassis empty; subtract from GVWR to get your build budget. Respect weight distribution (target near 50/50 front/rear, and left/right within ±5%).
- Body condition: Check roof seams, door frames, floor rot, and any sag in the box rails.
- Access & egress: Decide early: roll-up vs barn doors, and whether to add a side door (game-changer for “house-like” flow).
- Climate plan: Your insulation options, climate control systems, and venting dictate comfort more than fancy finishes.
- Registration & insurance: Converting to “motorhome” or “camper” on paper can change inspection and policy rules.
Quick Spec Snapshot (typical interiors)
| Box Length | Interior L × W × H (approx) | Useful Notes |
| 12’ | 140” × 92” × 78–84” | Ideal for solo + gear; easier to park |
| 14’ | 164” × 92” × 78–84” | Sweet spot for couple + desk & shower |
| 16’ | 188” × 92” × 84–90” | Room for fixed bed + dinette + big galley |
(Measure your specific body; older boxes vary.)
Planning Your Box Truck Camper Layout
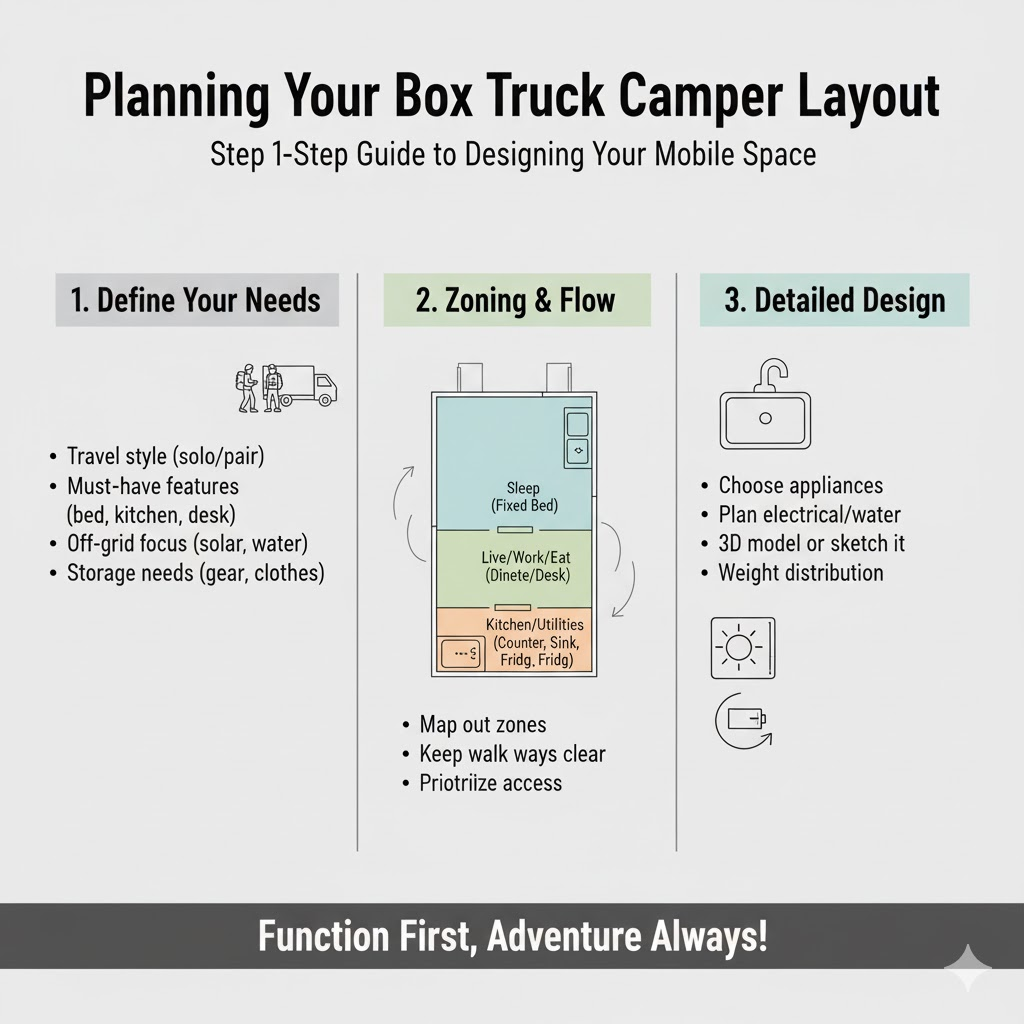
Maximizing Space Efficiency
- Zones, not rooms: Divide into four functional bays: sleep, cook, work, wash. Let each serve double duty.
- Aisle math: A 20–24” walking lane feels generous; 18” is tight but workable.
- Vertical first: Upper cabinets 12–14” deep; leave 18” above counter to avoid head bumps.
- Hidden volumes: Wheel-wells for drawers; bed platform for battery bank and water tank placement; toe-kicks for shoes and recovery gear.
- Modularity: Alum/ply modular furniture boxes let you reconfigure after a month on the road without a full rebuild.
Incorporating Essential Amenities
- Galley: 20–24” counter depth; energy efficient appliances (induction hob, 12-V fridge).
- Power: Roof solar + alternator/DC-DC; solar charge controller (MPPT), shunt monitor, proper fusing.
- Water: 20–40 gal fresh water system, 10–20 gal grey water system (internal in freezing climates).
- Air: Roof vent fan installation centered over the galley; second passive vent low for cross-flow.
- Heat/Cool: Diesel air heater or gasoline tap; reflectix window inserts; shade awning; portable A/C or mini-split (only with ample battery/charger).
- Bath: Indoor/outdoor shower, cassette or composting toilet; waterproof tray with drain.
Step-by-Step Guide to Converting Your Box Truck
Preparing the Vehicle
- Baseline inspection: Frame rails, leafs/coils, brake lines, roof seams, door headers.
- Power wash & strip: Remove old staples, tie-downs, and flaking paint.
- Rust & seal: Treat metal, patch soft floor spots, reseal roof seams with urethane.
- Plan penetrations: Sketch roof plan for vents, solar, and pass-throughs—measure twice, drill once.
Installing Insulation and Flooring
Insulation Options (walls/ceiling/floor)
| Material | R-Value (per inch) | Pros | Cons | Best Use |
| Polyiso board | ~6.0 | High R, rigid, easy to tape | Loses R in very cold; seams matter | Walls/ceiling with furring |
| XPS board | ~5.0 | Moisture-resistant, affordable | Off-gassing concerns; compresses | Floor panels |
| Mineral wool | ~4.0 | Fire-resistant, sound-deadening | Needs cavity & vapor strategy | Between studs; acoustic control |
| Closed-cell spray foam | ~6.5 | Air + vapor + structure | Cost; irreversible; wiring chase harder | Roof curves, odd gaps |
| Thinsulate | ~3.3 | Light, mold-resistant, easy | Lower R/inch; costly | Doors, small cavities |
Floor build (robust, quiet):
Subfloor sleepers (¾” plywood ripped to 2–3” strips) → 1–1.5” XPS between → ¾” tongue-and-groove plywood → vinyl plank or rubber coin. Seal edges; leave service hatches over tanks/batteries.
Building and Installing Furniture
- Structure first: 80/20 aluminum or ¾” ply boxes anchored to wall furring and floor (never just into skin).
- Bed platform: 14–16” high clears low-profile water tank and LiFePO₄ bank; add vented louver panels.
- Galley: Marine latches, radius corners, and backsplash with wipeable paneling.
- Dinette/desk: Slide-out table from bench; converts to guest bed if needed.
- Weight discipline: Heaviest items (batteries, water) centered and forward of rear axle for weight distribution.
Setting Up Electrical and Plumbing Systems
Electrical (12-V DC backbone + optional 120-V AC)
- Loads & math (battery bank sizing):
- Fridge 12 V: 40–60 Ah/day
- Vent fan: 10–20 Ah/day
- Lights/chargers: 10–25 Ah/day
- Induction (occasional): 50–80 Ah/day (via inverter)
Typical daily use: ~100–180 Ah → LiFePO₄ bank 200–300 Ah (usable) keeps two no-sun days in reserve.
- Fridge 12 V: 40–60 Ah/day
- Generation & charging:
- Solar power system: 400–800 W on flat roof (tilt only if you love ladders).
- MPPT solar charge controller: Sized at 30–60 A depending on array.
- Alternator/DC-DC charger: 30–60 A for driving-day top-ups.
- Shore/inverter-charger (optional): 30 A shore with proper transfer switch.
- Solar power system: 400–800 W on flat roof (tilt only if you love ladders).
- Distribution & protection:
- Main fuse at battery positive; bus bars; labeled circuits.
- Wire gauge: 2/0 for short inverter runs; 4–8 AWG for chargers; 12–14 AWG for branch.
- Bond negatives to single ground point; chassis bond per manufacturer.
- Electrical wiring basics: strain relief, grommets at pass-throughs, heat-shrink on every crimp.
- Main fuse at battery positive; bus bars; labeled circuits.
Plumbing (fresh/grey, hot/cold)
- Fresh water system: 20–40 gal tank low and centered; strainer → pump (3–5 GPM) → accumulator → cold manifold; water heater (diesel, propane, or 120-V) → hot manifold.
- Grey water system: 10–20 gal under-slung with skid or interior tote in freezing regions; vent line outside.
- Plumbing layout: PEX-B with push-fit or crimp; color code lines; service loop at each fixture.
- Vent & drain: Roof vent near galley; trap/loop to control odors; drain valves reachable without crawling under.
Vent fan installation & roof plan
- One powered fan mid-ship; one passive vent low (door louver) for stack effect.
- Seal with butyl + urethane; backer plate under fan flange to stiffen roof.
Inspiring Box Truck Camper Conversion Examples
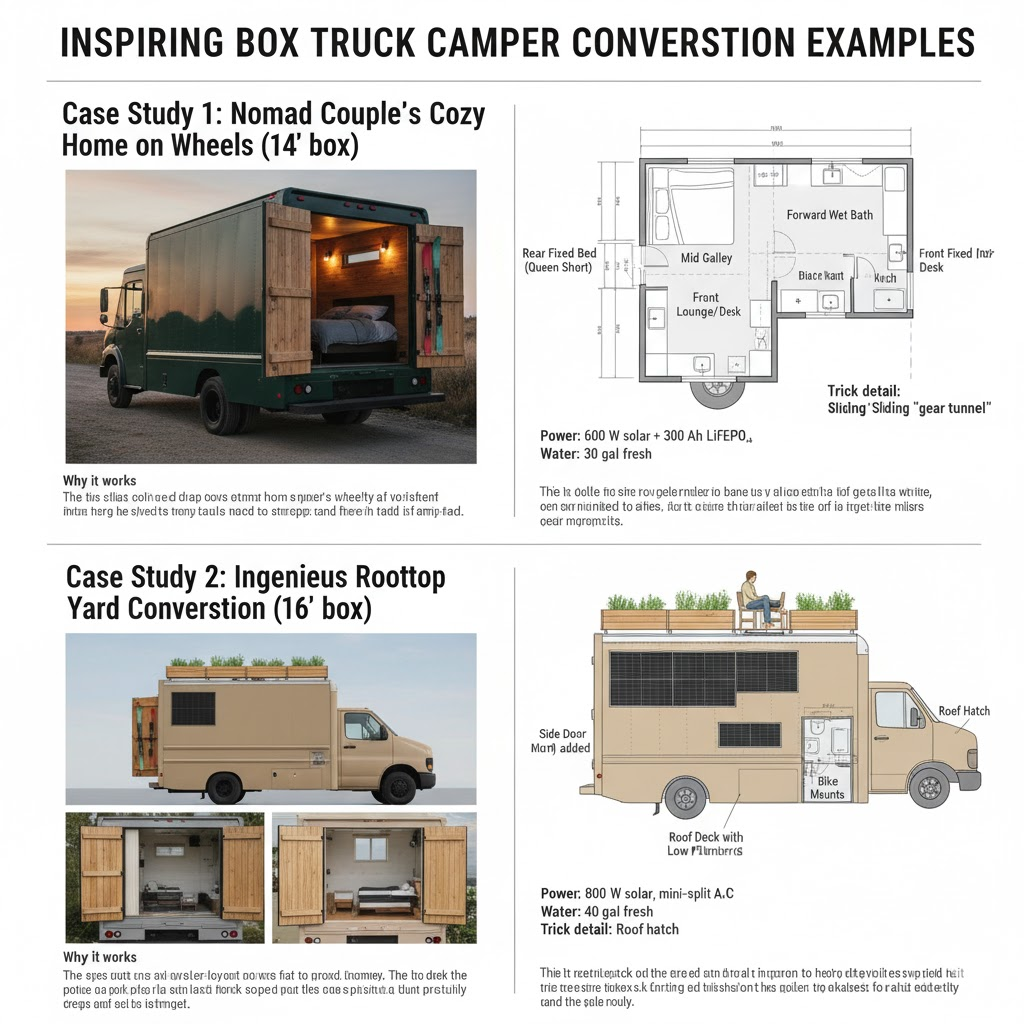
Case Study 1: Nomad Couple’s Cozy Home on Wheels (14’ box)
Layout: Rear fixed bed (queen short), mid galley, forward wet bath, front lounge/desk.
Power: 600 W solar + 300 Ah LiFePO₄, 40 A DC-DC, 2000 W inverter.
Water: 30 gal fresh inside bench; 15 gal grey underslung with skid.
Trick detail: Sliding “gear tunnel” under bed for skis/boards, accessible from barn doors.
Why it works: Mass centered just ahead of axle; quiet ride, no porpoising. The straight walls made cabinetry painless and the camper conversion guide kept wiring tidy behind removable panels.
Case Study 2: Ingenious Rooftop Yard Conversion (16’ box)
Layout: Side door added; interior kept open with folding Murphy bed and bike mounts. Roof deck with low planters (herbs) around a recessed solar field.
Power: 800 W solar, 400 Ah LiFePO₄, mini-split A/C for hot climates, diesel heat for winter.
Water: 40 gal fresh, 20 gal grey, outdoor shower at rear.
Trick detail: Roof hatch beside fan for deck access; hatch doubles as emergency exit.
Why it works: The deck shade drops roof temps; solar charge controller keeps panels efficient. Smart weight distribution (A/C compressor and batteries forward) keeps steering feel OEM.
Tips and Resources for Your Conversion Journey
Recommended Tools and Materials
- Tools: Track saw, rivnut tool, step bits, hydraulic crimper, PEX crimper, torque wrench, multi-meter, thermal camera (to spot leaks/bridges).
- Fasteners & sealants: Rivnuts + machine screws for serviceable panels; butyl tape and urethane for roof; thread locker for everything that shakes.
- Materials: ¾” birch ply (void-free), aluminum angle & 80/20, XPS/Polyiso sheets, PEX-B, marine fuse blocks, tinned copper cable, stainless hardware.
- Fire & safety: ABC extinguisher near galley + by bed, propane detector (if used), battery monitor with alarms, CO/Smoke combo.
Online Communities and Support
- Conversion forums & subreddits: Great for camper conversion examples, wiring diagrams, and troubleshooting oddball bodies.
- Local makerspaces: Access to table saws, welders, and seasoned volunteers.
- Weigh stations & scales: Weigh after each major stage to keep your vehicle conversion within limits.
- Fabrication shops: For side door cuts, window installs, and roll-up door deletes.
Weight & Power Cheat Sheets
Weight Distribution Planner
| Component | Weight (lb) | Proposed Location | Notes |
| Batteries (300 Ah LiFePO₄) | ~80–100 | Under bed, forward of axle | Vent space for BMS cooling |
| Fresh water 30 gal | ~250 (full) | Low, center-left | Baffle or rectangle tank |
| Grey water 15 gal | ~125 (full) | Low, center-right | Opposite fresh for balance |
| Galley + fridge | 150–220 | Midship | Tie into wall furring |
| Cabinets & bed | 200–350 | Evenly left/right | Avoid top-heavy storage |
| Bikes/boards/tools | 40–120 | Rear tunnel | Secure to L-track |
Battery Bank Sizing (daily use, 12 V)
| Device | Watts | Hrs/day | Wh/day | Ah/day |
| 12-V Fridge | 45 | 18 (duty cycle) | 810 | 67.5 |
| Vent Fan (avg) | 18 | 8 | 144 | 12 |
| LED Lights | 12 | 4 | 48 | 4 |
| Laptop/Phones | 60 | 2 | 120 | 10 |
| Induction Hob (boil/saute) | 1200 | 0.3 | 360 | 30 (via inverter) |
| Total | 1,482 Wh | ~124 Ah |
Add 20–30% buffer, round up to 200–300 Ah LiFePO₄. Solar 400–800 W keeps up in most seasons; combine with a 30–60 A DC-DC charger for cloudy weeks.
Conclusion: Embarking on Your Box Truck Camper Adventure
A box body is a builder’s gift: square corners, open spans, and enough roof for serious solar. Start with the boring but crucial: GVWR math, weight distribution, and a sober plan for air, heat, and moisture. Then design in zones, keep heavy systems centered and low, and build surfaces you can wipe down in 30 seconds. Your DIY camper conversion will live or die by airflow, insulation continuity, and serviceable wiring—get those right and the rest becomes finish carpentry.
Whether you’re chasing off-grid living weekends or a full-time mobile home, iterate in stages. Drive it as a “Phase 1” shell for a week, keep notes, and only then lock in cabinetry. The best box truck camper ideas come from the first 500 miles, not the first Pinterest board.
Fast Reference (print this before your first cut)
- Layout: 24” aisle; bed 54–60” wide; galley 20–24” deep; shower 24” square minimum.
- Insulation: 1–1.5” walls/ceiling; 1” floor with XPS; seal every seam.
- Power: 200–300 Ah LiFePO₄; 400–800 W solar; MPPT controller; 30–60 A DC-DC.
- Water: 20–40 gal fresh; 10–20 gal grey; PEX-B and an accumulator.
- Vent: One powered roof fan + low side vent; cross-flow beats brute-force cooling.
- Safety: Two extinguishers, propane/CO monitor, proper fusing at battery, grommets on every pass-through.
Build like a boat, wire like an airplane, and think like a small apartment. That’s the recipe for a durable, quiet, and cozy vehicle conversion that feels like home from the first night out.
Leave a Reply