
Introduction to Rock Lights for Trucks
When the trail turns to boulders and ruts, rock lights for trucks do more than decorate—they map the ground you’re about to put a tire on. Proper underbody and wheel well lighting lets you spot diff drops, sharp shale, and washouts before your sidewall does, and it keeps your spotter from shouting in the dust. Below is a size-and-usage driven guide to choosing LED rock lights that balance durability, beam control, install effort, and style, with hard-won tips for routing, fusing, and aiming so your off-road lighting is useful rather than a glare bomb.
Top Rock Light Kits for Trucks
Organized by real-world use: pod construction, mounting style, beam behavior, and wiring approach. Specs vary by revision; treat numbers as ranges and confirm with the manufacturer before ordering.
Diode Dynamics Stage Series LED Rock Lights
Why it’s on the list: Dense aluminum housings with proper optics (not just diffused blobs) that throw usable “pools” instead of hot spots.
Best for: Drivers who want controlled underbody lighting that won’t blind the spotter stooping near the tire.
Field notes: The optical lens creates a defined oval—mount at 30–45° inboard for maximum ground painting without wheel glare. Heat-sinking is real; give it airflow if you trail crawl in summer.
Watch-outs: Current draw per pod is higher than budget sets—size your fuse accordingly.
LUX Lighting Systems LED Truck Bed Lighting
Why it’s on the list: Slim strips for truck bed lighting that disappear under rails but light the entire box.
Best for: Bed work, cargo bed lighting, and overland setups where tailgate cooking needs shadow-free task light.
Field notes: Low profile, adhesive + screw combos hold through washboards. Use the included diffuser to avoid “LED dot” glare on glossy coolers.
Watch-outs: Keep the run lengths consistent; uneven volt drop equals uneven brightness across strips.
Rigid Industries Rock Light Kit
Why it’s on the list: Overbuilt housings and potted electronics for abuse, with a simple harness that just works.
Best for: Harsh climates (salt belt, silt beds), frequent pressure-washing, and folks who prioritize “survive anything” truck lighting kits.
Field notes: Hardware is corrosion-resistant; if you live on mag chloride, still add dielectric grease.
Watch-outs: Beam is wide and bright; aim carefully or you’ll nuke night vision. Great as vehicle illumination, but tone it down on busy trails.
Lift Theory Single Color Rock Lights
Why it’s on the list: Honest single-color pods with good diffusion—no rainbow menus, just reliable white/amber.
Best for: Minimalists who want functional underbody rock lights with minimal wiring complexity.
Field notes: Amber reduces dust glare in convoys. Single-color keeps current predictable—helpful for plug and play rock lights on smaller relays.
Watch-outs: No app toys. If you want remote control rock lights or wireless rock lights, look elsewhere.
LUX Lighting Systems MONSTER Magnetic LED Rock Light Kit
Why it’s on the list: True magnetic rock lights: move a pod in seconds when you swap skid plates or add sliders.
Best for: Fabricators and testers who change layouts; great for temporary bed accent lighting or quick exterior truck lighting at camp.
Field notes: The magnets are fierce; clean the steel and add a thin paint-safe film if you’re picky. Awesome for temporary universal rock lights on rented rigs.
Watch-outs: Magnets need metal—if you’re all aluminum or plastic liners, use the included brackets.
Quick Comparison Table (realistic ranges)
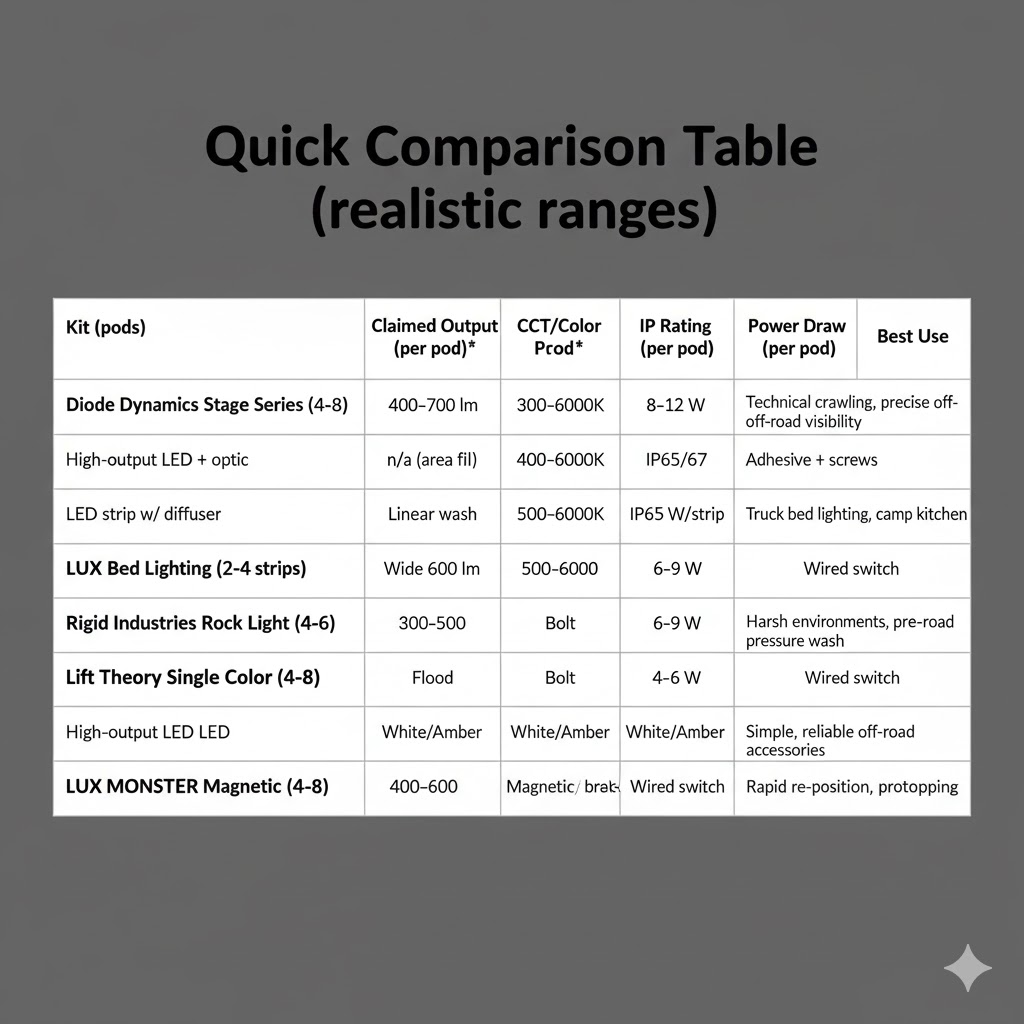
| Kit (pods) | LED Type | Beam Pattern | Claimed Output (per pod)* | CCT/Color | IP Rating | Power Draw (per pod) | Mounting | Controller | Best Use |
| Diode Dynamics Stage Series (4–8) | High-output LED + optic | Elliptical “pool” | 400–700 lm | 3000–6000K | IP67/68 | 8–12 W | Bolt | Wired switch / add-on dimmer | Technical crawling, precise off-road visibility |
| LUX Bed Lighting (2–4 strips) | LED strip w/ diffuser | Linear wash | n/a (area fill) | 4000–6000K | IP65/67 | 6–10 W/strip | Adhesive + screws | Wired switch | Truck bed lighting, camp kitchen |
| Rigid Industries Rock Light (4–6) | Potted LED cluster | Wide flood | 400–600 lm | 5000–6000K | IP68 | 6–9 W | Bolt | Wired switch | Harsh environments, pressure wash |
| Lift Theory Single Color (4–8) | Diffused LED | Flood | 300–500 lm | White/Amber | IP67 | 4–6 W | Bolt | Wired switch | Simple, reliable off-road accessories |
| LUX MONSTER Magnetic (4–8) | High-output LED | Flood | 400–600 lm | White/Amber | IP67 | 6–9 W | Magnetic / bracket | Wired switch | Rapid re-position, prototyping |
*Output claims vary by revision; verify on the product sheet.
Factors to Consider When Choosing Rock Lights
Durability and Waterproofing
- Ingress rating: Aim for waterproof rock lights at IP67 minimum (short submersion) or IP68 (deeper/longer). Dust is the silent killer—look for potted electronics.
- Salt & silt: Stainless hardware plus sealed cable glands matter more than marketing. In the rust belt, rinse after each trip.
- Housing: Aluminum sheds heat; plastic can be fine if potted well. Heatsinking extends LED life and keeps color stable.
Installation Ease
- Harness quality: Tinned copper, molded connectors, and heat-shrink boots beat budget crimp trees.
- Mounting options: Brackets plus low profile rock lights reduce snag risk. Magnetic rock lights are clever for temporary routing.
- Control: Simpler is safer on trail. Fancy RGB rock lights are fun, but a physical kill-switch beats any app when a relay sticks.
Brightness and Light Patterns
- Flood vs controlled: Rock work benefits from even ground wash, not raw lumen bragging. A tight optic near the tire plus a wider wash near the diff is ideal.
- Color: White for clarity, warm/amber for dust and bugs. Color changing rock lights/multi color rock lights look great at camp; keep them dim on shared trails.
- Glare control: Mount a pod slightly inboard and forward of the tire centerline to avoid blasting the sidewall. That’s how you get useful vehicle lighting instead of sparkly photos.
How to Install Rock Lights on Your Truck
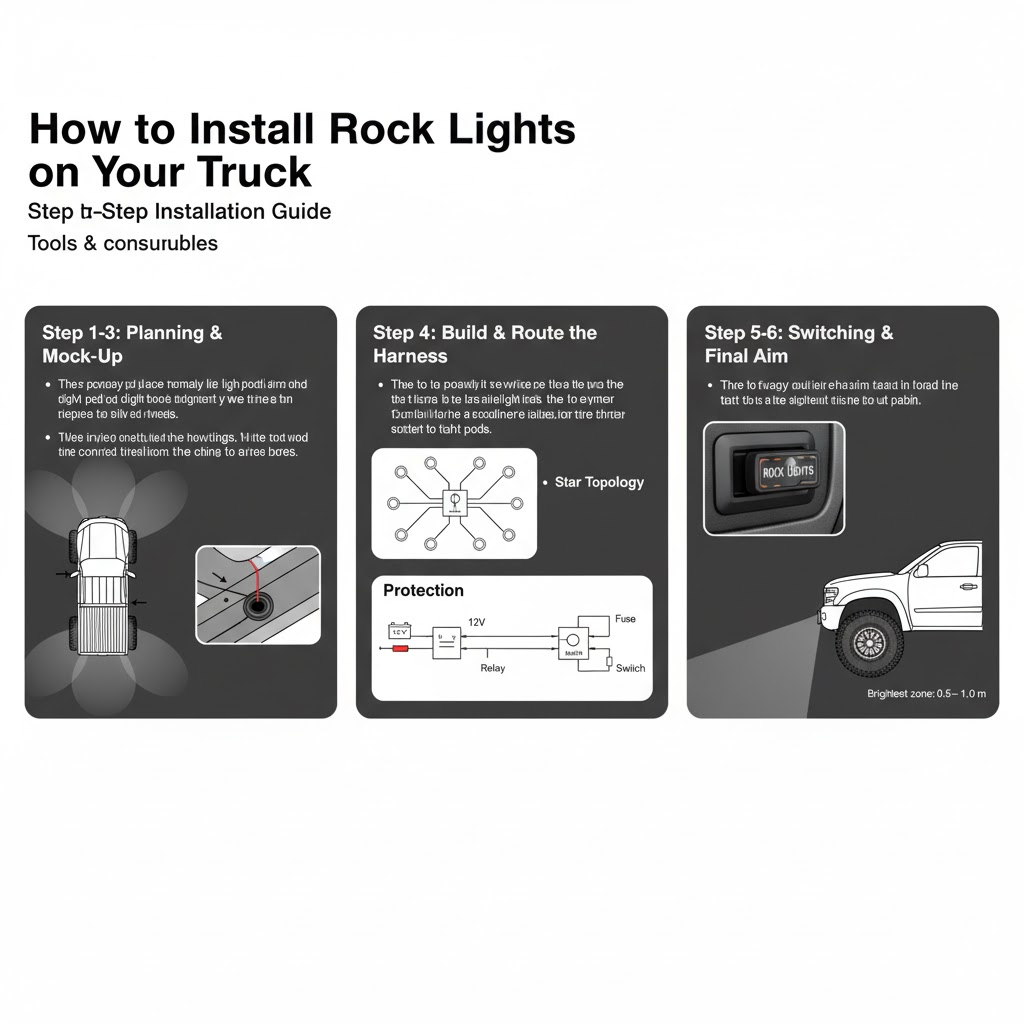
Step-by-Step Installation Guide
Tools & consumables: step bits, rubber grommets, heat-shrink, marine-grade butt connectors, split loom, stainless hardware, dielectric grease, relay harness (40A), add-a-circuit, fuse assortment.
- Plan the pools
Park on level ground at dusk. Set a work light on the ground where you wish light would land—front axle line, transfer case, rear axle. Mark those points with painter’s tape. - Mock-mount with tape/magnets
Temporarily place pods (or use magnetic versions) at each mark. Power them from a bench supply or a spare 12V battery to confirm coverage. Adjust angle until sidewall glare disappears and the ground is evenly lit. - Commit the mounts
For bolt-on pods, drill pilot holes and deburr. Use grommets anywhere a wire passes through metal. On plastic liners, back the screws with fender washers. - Build the harness
- Star topology: Run each pod’s lead to a central junction near the firewall; avoid daisychaining long spans.
- Wire size: Up to 8 pods at ~6–10 W each → 48–80 W total (4–6.7 A @12V). Use 16 AWG runs to pods, 12–14 AWG main feed.
- Protection: Add an inline fuse at the battery and a relay triggered from an ignition or auxiliary switch.
- Star topology: Run each pod’s lead to a central junction near the firewall; avoid daisychaining long spans.
- Route clean
Follow frame rails, keep clear of exhaust and moving parts, cross at factory loom points, and zip-tie every 20–25 cm. Add split loom in high-abrasion zones. - Switching
Use a weatherproof toggle in the cabin or integrate into an accessory switch panel. Label it; at night every unlabeled rocker looks the same. - Test & aim
In the dark, aim pods so the brightest zone sits 0.5–1.0 m ahead of each tire contact patch. Re-torque hardware after a shakedown run.
Fuse/Wire Cheat Sheet
| Pod Count | Est. Total Draw | Recommended Main Fuse | Main Feed Wire (≤3 m) | Notes |
| 4 pods @ 6 W | ~2.0 A | 5 A | 16 AWG | Small trucks, low profile rock lights |
| 6 pods @ 8 W | ~4.0 A | 7.5–10 A | 14 AWG | Typical underbody + two wheel wells |
| 8 pods @ 10 W | ~6.7 A | 10–15 A | 12–14 AWG | Full underbody + bed accent lighting |
| 10–12 mixed | 7–10 A | 15–20 A | 12 AWG | Add second relay zone for bed/roof |
Safety Precautions
- Battery first: Disconnect negative terminal before routing.
- Heat management: Keep pods and wire at least 10 cm from exhaust paths; add heat sleeves if necessary.
- Sealing: Every splice gets heat-shrink; every pass-through gets a grommet. Water finds gaps.
- Grounds: Star-ground to a clean, paint-free chassis point or the battery. Poor grounds cause flicker and hot switches.
- EMI hygiene: Keep lighting runs away from wheel-speed sensor harnesses to avoid strange ABS lights.
- Trail etiquette: White light only when crawling; use low intensity in groups. Save RGB rock lights for camp.
Practical Patterns (what actually works)
8-pod baseline (full-size truck): 2 forward of the front tires (frame horns), 2 behind the front tires (trans crossmember), 2 ahead of the rear tires, 2 on the rear frame aiming at shackles. Add 2 more for wheel well lighting if you run big tires.
Bed task lighting: 2 strips under rails, one above the tailgate latch—shadow-free cooking and packing.
Two Useful Tables You’ll Actually Use
Fit & Pod Placement by Wheelbase
| Wheelbase | Pods (min) | Pods (ideal) | Notes |
| Mid-size (120–127”) | 6 | 8 | Fill front/rear axle + center tunnel |
| Full-size (140–157”) | 8 | 10 | Add wheel wells or transfer case focus |
| Long-bed/HD (160”+) | 10 | 12 | Split into two zones (front/rear relays) |
Mounting & Control Options at a Glance
| Need | Best Option | Why |
| Quick re-position | Magnetic rock lights | Prototype without drilling; great for rentals |
| One-evening install | Plug and play rock lights harness | Fused, labeled, less crimping |
| App control & scenes | Wireless rock lights w/ Bluetooth | Scenes/colors at camp (use responsibly) |
| Pure function | Single-color pods + toggle | Bright, simple, reliable |
FAQs (fast)
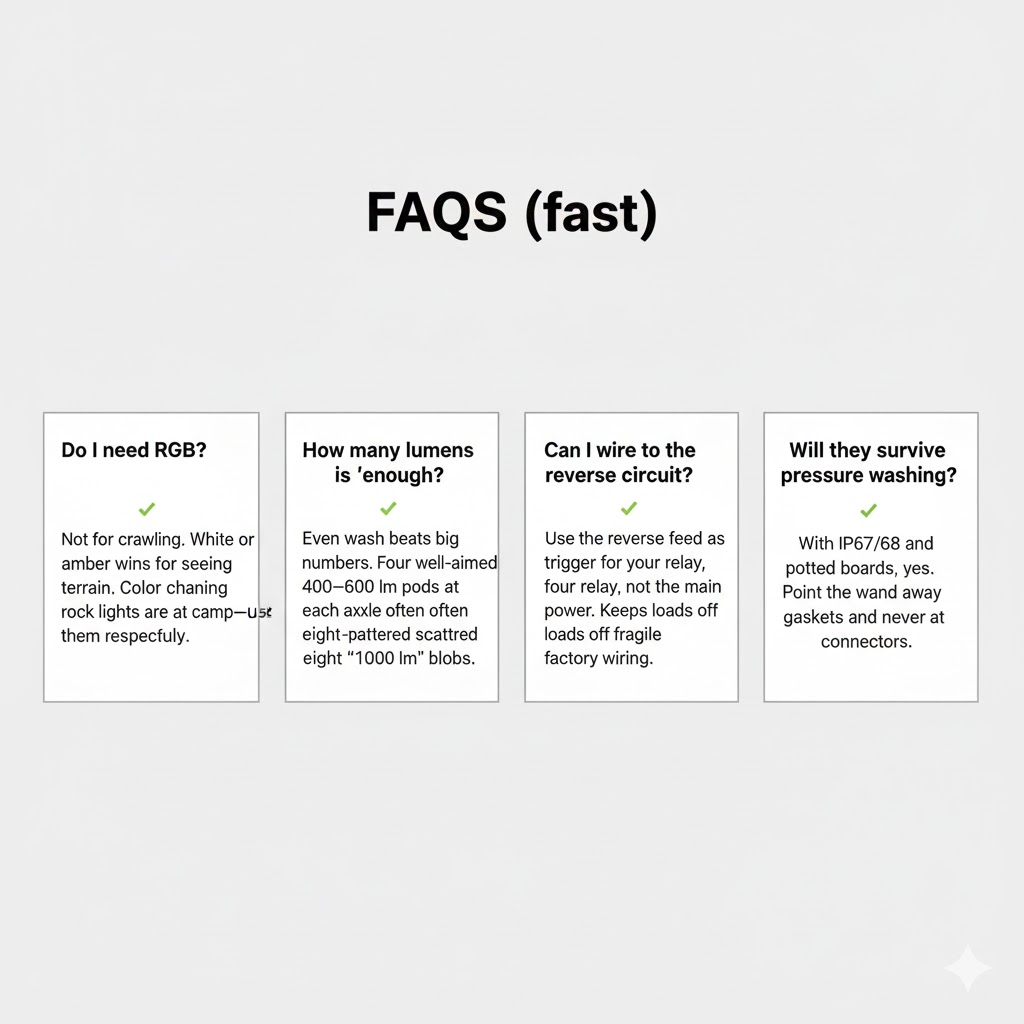
Do I need RGB?
Not for crawling. White or amber wins for seeing terrain. Color changing rock lights are fun at camp—use them respectfully.
How many lumens is “enough”?
Even wash beats big numbers. Four well-aimed 400–600 lm pods at each axle often out-perform eight scattered “1000 lm” blobs.
Can I wire to the reverse circuit?
Use the reverse feed as a trigger for your relay, not as the main power. Keeps loads off fragile factory wiring.
Will they survive pressure washing?
With IP67/68 and potted boards, yes. Point the wand away from gaskets and never at connectors.
Conclusion
Good rock lighting is a tool, not a toy. Choose housings that survive water and dust, beams that paint the ground (not your sidewalls), and a harness that won’t strand you with a short. Mount thoughtfully, fuse correctly, and aim low. Do that and your off-road adventures get safer, your spotter gets quieter, and your photos look better without blinding the trail.
For the rest of your night kit—reflectors, jumper cables, first-aid, and triangle storage—pack a dedicated safety tote; this night-time safety checklist stays in our rigs year-round:
Final Thoughts on Enhancing Your Truck with Rock Lights
Rock lights are one of the most satisfying truck accessories you can add: low current, high utility, and instant confidence on sketchy terrain. Whether you favor bombproof pods, sleek bed strips, or a flexible rock light kits layout, treat them like any other critical off-road gear—install carefully, test at night, and keep a spare relay in the glove box. Your truck customization should make the vehicle better to use, not just brighter to look at. With the right kit and a clean install, your vehicle lighting will be a quiet advantage wherever the trail turns dark.
Leave a Reply